How to create registration form with all field validation
Scenario :- Here creating Registration Form - Form Validation done in Three different way.
Actions / way :-
1> Click on Submit button - where all fields are required,
2> OnClick in Text-field
3>OnKeyup in Text-field
Text-Field Validation :-
1> Name, Phone Number, and Email Validation.
Interactions:-
1> Show error message
2> Text field border color change as per value
Step - 1 - First create or place all fields and labels in canvas and create Registration Form Design.

Step -2 - Create Required Field and make it hidden

Step -3 - Create Error message for each field and set as hidden

Step - 4 - Make group all error message in one

Step - 5 - Submit Button Click Validation :- "it will show, text-field validation as Required*"
Select Submit Button -> In Properties -> click on- Onclick, it will open Add Case
In Case Editor -> top click Add Condition

Step - 6 - In Condition Builder -> will add values which will check Empty field , need for required field validation. Please check below screen shot.
Set values for First Name and click OK.

Step - 7 - After adding condition in condition builder need to show message as this field is required. so now set the required message :-
In Case Editor -> Click to add actions -> Widgets -> Show
Configure actions -> Checked the "FirstNameRequire" Message.
This message need to hide after some time so need to add wait with 2000ms
then hide the required field message and click OK.


Follow the same step to add field validation like above done for FirstName, Follow the same step for Last Name, Email, and Mobile No.
Step - 8 - Create Success Message Page -> While all fields input is correct and validated then finally it will go to success Page, so need to create success message Page.

Step - 9 - Link Success Message Page with Submit Button when all Fields are validated

Step - 10 - Now check all cases are done for onclick submit button validation

Step - 11 - OnClick on Field Validation :-
Now create individual group for each field like below screenshot , selected Last name field and labels and made the group as name Last Name.
Follow same step for all fields.

Step -12 - From Libraries Place box just behind the First Name it will be set the border color red and green as per validation.
Arrange the box just behind the text box but their border is visible and hide the First Name text-field border.

Interaction Style to Box (border) added behind Text-Field

Hide first name text field border

Step - 13 - Now Copy the box named border and place behind each Text Field. and hide Text Field border.

Step - 14 - Adding Condition to each text field individually. as per below screen shot , first consider first name example .
a> Select the First Name Text Field
b>In Properties Tab click on OnClick to add case.
c> In Case Editor -> Name The case as Empty field validation
d> Click on Add condition button.

e> In Condition Builder -> Add values as empty field validation see below screen shot

f> After closing or clicking OK in condition Builder , Now in Case Editor -> Click to add actions -> Enable / Disable -> Enable, In Configure actions -> Check the First name Border

Set selected border to false -> as below screen shot
g> In case Editor -> Click to add actions -> Set Selected / Checked ->Selected
Configure actions -> checked First Name Border in bottom select Value as False

Show Require Field Message
h> In Case Editor -> Click to add actions -> Widgets -> Show / Hide -> Show
Configure actions -> Checked First Name Require Message

Message Interaction add Wait, till what ms want to show error message
i> In Case Editor -> Click to add actions -> Miscellaneous -> Wait
Configure actions -> Fill - 2000ms

Hiding the required message
j> In Case Editor -> Click to add actions -> Widgets -> Hide
Configure actions -> Checked Required message

Follow the same Step with LastName , In Mobile Text Field only need to change condition instead to alpha need to select Number, and Max length need to assign 10.
Step - 15 - Text Field Validation onKeyUp, here only add valid and invalid case to check the condition.
a> Select First Name Text Field and in Properties tab click on More Event - dropdown select OnKeyUp, it will open case Editor.

b> In Case Editor -> Top Name the case and click on Add Condition Button

c> In Condition Builder set the values and click OK as per below screen shot

d> Come back to case editor -> Click to add actions -> Enable / Disable - > Enable
Configure actions -> Check First name Border

Set border to true
e> In Case Editor -> Click to add actions -> Set Selected / Checked -> Selected
Configure actions -> checked First Name Border
In Bottom -> Select Value as True and click OK
Valid Condition is completed.

f> Invalid condition :- Now add case for Invalid Case check.
In same OnKeyUp Add Case , it will open case Editor -> Name the case .
g> Click to add actions -> Set Selected / Checked
Configure actions -> Checked First Name Border
In Bottom -> Select Values as false

Disabled Border
h> In case Editor -> Click to add actions ->Enable / Disable -> Disable
Configure actions -> Checked First Name Border

Show Valid Message
i> In Case Editor -> Click to add actions -> Widgets -> Show / Hide -> Show
Configure actions -> Checked First Name Valid Message

Use Wait to display valid message
j> In Case Editor -> Click to add actions -> Miscellaneous -> Wait
Configure actions -> Fill wait -> 2000 ms

Hide the Valid Message
k> In Case Editor -> Click to add actions -> Widgets -> Show / Hide -> Hide
Configure actions -> Checked First Name Valid Message and click ok.
Invalid message is completed

Step - 16 - Email Field Validation (OnKeyUp) :- in Email field check @, .com these characters are checking in Email field Validation.
a> Select Email Text Field -> In Properties tab -> click on More Action -> Select OnKeyUp

b> In case Editor -> Write case name (Valid input check) and click on Add Condition Button

c> In Condition Builder set the values and add Local variable and Insert variable / Functions as per below Screen shot.
Checking @ condition using values -> [[LVAR1.text.indexOf('@')]] is greater than or equals 1

d> Here checking LastIndex value "." [[LVAR1.text.lastIndexOf('.')]] is greater than [[LVAR1.text.indexOf('@')]]

adding LastIndex value grater than value [[LVAR1.text.indexOf('@')]]

Now Email validation case is done click Ok

Interaction Style to the Text Field
e> Come back to case editor -> Click to add actions -> Enable / disable -> Disable
Configure actions -> Checked Email Border

Set the border to True
f> In case editor -> Click to add actions -> Set Selected / Checked -> Selected
Configure actions -> Checked Email Border,
In Bottom -> Set Values as True
Valid case is done .

Now Add Case to Invalid Input Check
g> Same in OnKeyUp Add Case
In Case Editor -> Write Name of the Case
Click to add actions -> Set Selected / Checked -> Selected
Configure actions -> Checked Email Border
In Bottom Set Values as False

h> In Case Editor -> Click to add actions -> Enable / Disable -> Disable
Configure actions -> Checked Email Border

Show Email Valid Message
i> In Case Editor -> Click to add actions -> Widgets ->Show
Configure actions -> Checked Email Valid Message

Now say valid message to wait
j> In Case Editor -> Click to add actions -> Miscellaneous -> Wait
Configure actions -> Wait - 2000 ms .
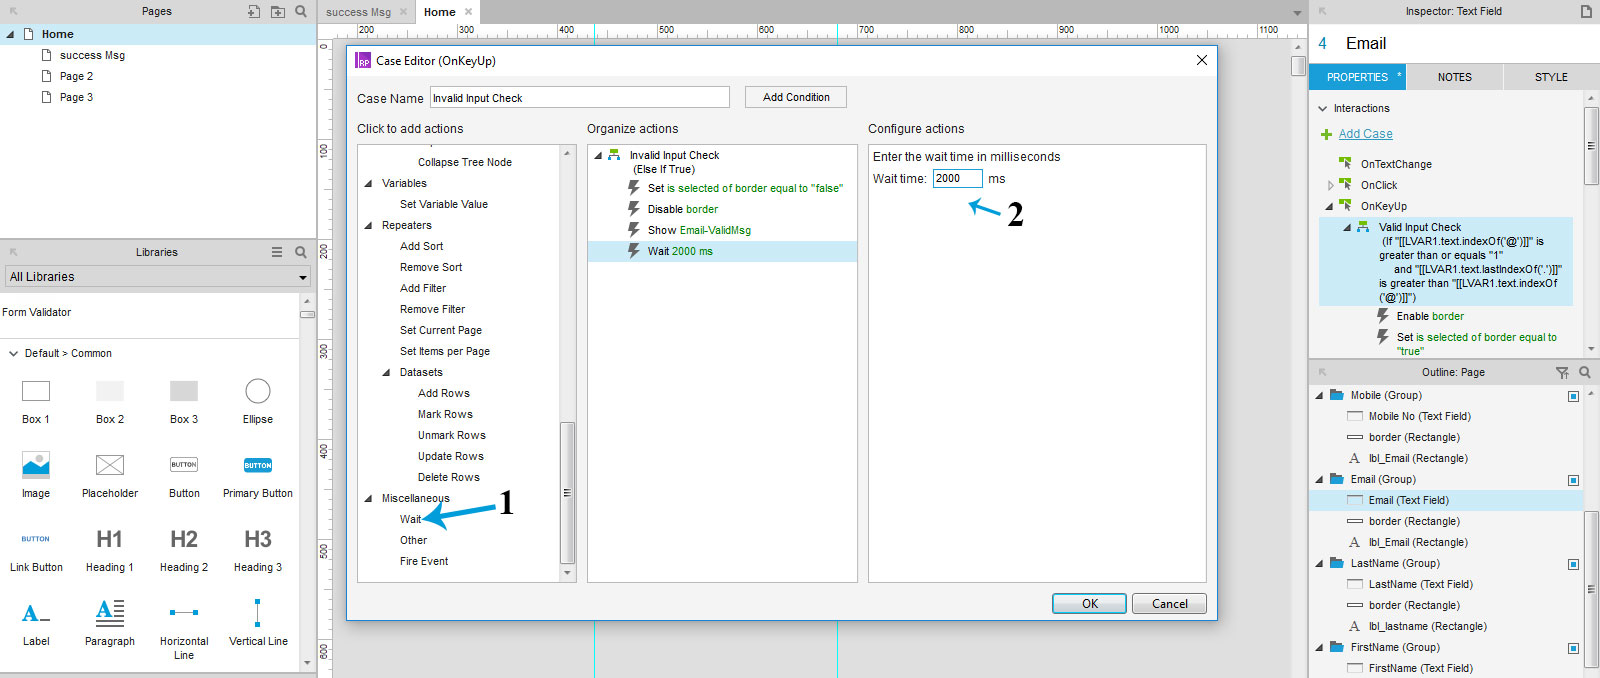
Now hide the valid message
k>In Case Editor -> Click to add actions -> Widgets ->Hide
Configure actions -> Checked Email Valid Message
Invalid input check case is completed.

Now Preview check registration page. it is as per below image in different cases.

Thanks.


